
Watermark Size, Placement & Opacity for Product Photos
Product photo watermarks: pick size, placement and opacity that protect without hiding the product. Starting values, examples and a Shopify how-to.
10 min readUpdated Oct 9, 2026
The short answer: starting settings for product photo watermarks
For most product photos, start with a mark about 10–15% of the image's shorter side at 30–50% opacity, placed where it doesn't cover the detail shoppers need. Then test it on your hardest photo and keep your main Google Shopping image unwatermarked. There's no universal standard, so treat these numbers as starting points. RD Watermark's own new-profile starter is a centered mark at 32% opacity with a slight −5° angle, and if you switch it to a logo, the logo size starts at 14%.
Every watermark is a trade-off. It has to be strong enough to make reuse unattractive, while the product stays easy to judge. This guide gives you suggested starting settings by goal, explains how to think about watermark size, placement and opacity, and ends with a test routine you can run in RD Watermark before you touch the whole catalog.
Quick-start settings by goal
Suggested starting points, not a standard
These ranges are our recommendations for a first test, based on the trade-offs explained below. They aren't research findings or an industry standard. Test them on your own photos and adjust.
| Goal | Placement | Size (shorter side) | Opacity | Notes |
|---|---|---|---|---|
| Subtle brand mark on catalog images | Bottom-right or bottom-left corner | 10–15% | 30–50% | Easy to crop out, so best for attribution, not theft deterrence. |
| Deter reuse on theft-prone images (lifestyle shots, original designs) | Center, slight angle | 15–25% | 25–40% | Harder to crop; keep it semi-transparent so the product still reads. |
| Maximum deterrence (supplier or wholesale previews, artwork) | Tiled pattern | 8–15% per tile, spacing 20–35% | 15–30% | Hardest to remove cleanly; also the most intrusive. |
Three ideas drive these numbers. Lower opacity is needed as coverage grows, because a tiled pattern at corner-mark opacity would bury the product. Corners are easy to crop, so a corner mark is mainly for attribution. Center and tiled marks trade looks for protection.
RD Watermark's starter profile (centered, 32% opacity, −5°) sits inside the center range. The Classic watermark template (centered, 50% opacity, −15°) is a bolder option above it.
How big should a watermark be?
Measure size against the shorter side
RD Watermark measures logo size against the image's shorter side, from 5% to 50%. The logo is fitted inside a square of that size, so a 15% logo on a 2000 × 3000 pixel portrait photo fits inside a 300-pixel square. Because the unit is the shorter side, the mark stays consistent across portrait, landscape and square photos.
Size isn't area. A square logo at 15% of the shorter side covers about 2.25% of a square image (0.15 × 0.15). That's simple arithmetic, and it's why a watermark that sounds big as a percentage can still look modest on the photo.
Too small vs. too big
Too small, and the mark is unreadable on mobile thumbnails and trivial to clone out. Too big, and it hides the texture, fit and detail that sell the product. Always check a mobile-sized preview: a logo that looks subtle on a desktop monitor can cover the product on a narrow screen.
The single-product watermark guide walks through that preview-and-check routine on one product.
Logo size vs. text size
Text watermarks use a Text size slider (8–128) instead of a percentage. The value is set against a reference photo with an 800-pixel shorter side, and the text scales with each image, so it looks proportionally the same on small and large photos. Extra text layers have their own Size slider, from 5% to 40%.
Keep watermark text short, such as a brand name or store domain. Longer text gets wider at the same size, so it either crowds the photo or needs a smaller size that's harder to read on a phone.
Watermark logo dimensions
Because RD Watermark sizes the logo relative to each photo, the logo file only needs enough resolution to stay sharp at the largest size you'll use. As a rule of thumb, make the file at least as wide as the biggest mark you expect: a 25% logo on a 2048-pixel photo is about 512 pixels across. An SVG scales cleanly at any size, so it avoids the question entirely.
Where to place a watermark on a product photo
The nine positions and when to use each
RD Watermark offers nine preset positions: the four corners, the four edge centers, and the center. There's no free drag positioning, so pick the preset that suits the photo.
- Corners: subtle brand attribution on catalog and detail images.
- Bottom center: a signature-style credit that reads like a caption.
- Center: deterrence on theft-prone images, because the mark crosses the product.
- Edge centers: tall or wide crops where a corner mark would land on the product.
Corner and edge positions sit a small fixed distance from the edge: 3% of the image's shorter side. The editor doesn't have a margin control today, so choose the position that fits rather than trying to nudge the mark.
Don't cover what sells
Keep the mark off the detail that makes the sale, such as texture, stitching, a label, or the face of a gemstone, unless deterrence matters more than conversion for that particular image.
Corners are the easiest to crop
Cropping is the simplest way to reuse a photo, and a corner mark is the first thing a crop removes. If an image gets copied a lot, move the mark toward the center or switch to a pattern.
Tiled watermark patterns
A tiled watermark repeats the mark across the whole photo. In RD Watermark, turn on Repeat as pattern and set Pattern spacing from 4% to 60% of the shorter side; that's the gap between tiles. Tight spacing gives a dense, protective pattern, and wide spacing keeps the product readable. Keep opacity low whenever you tile.
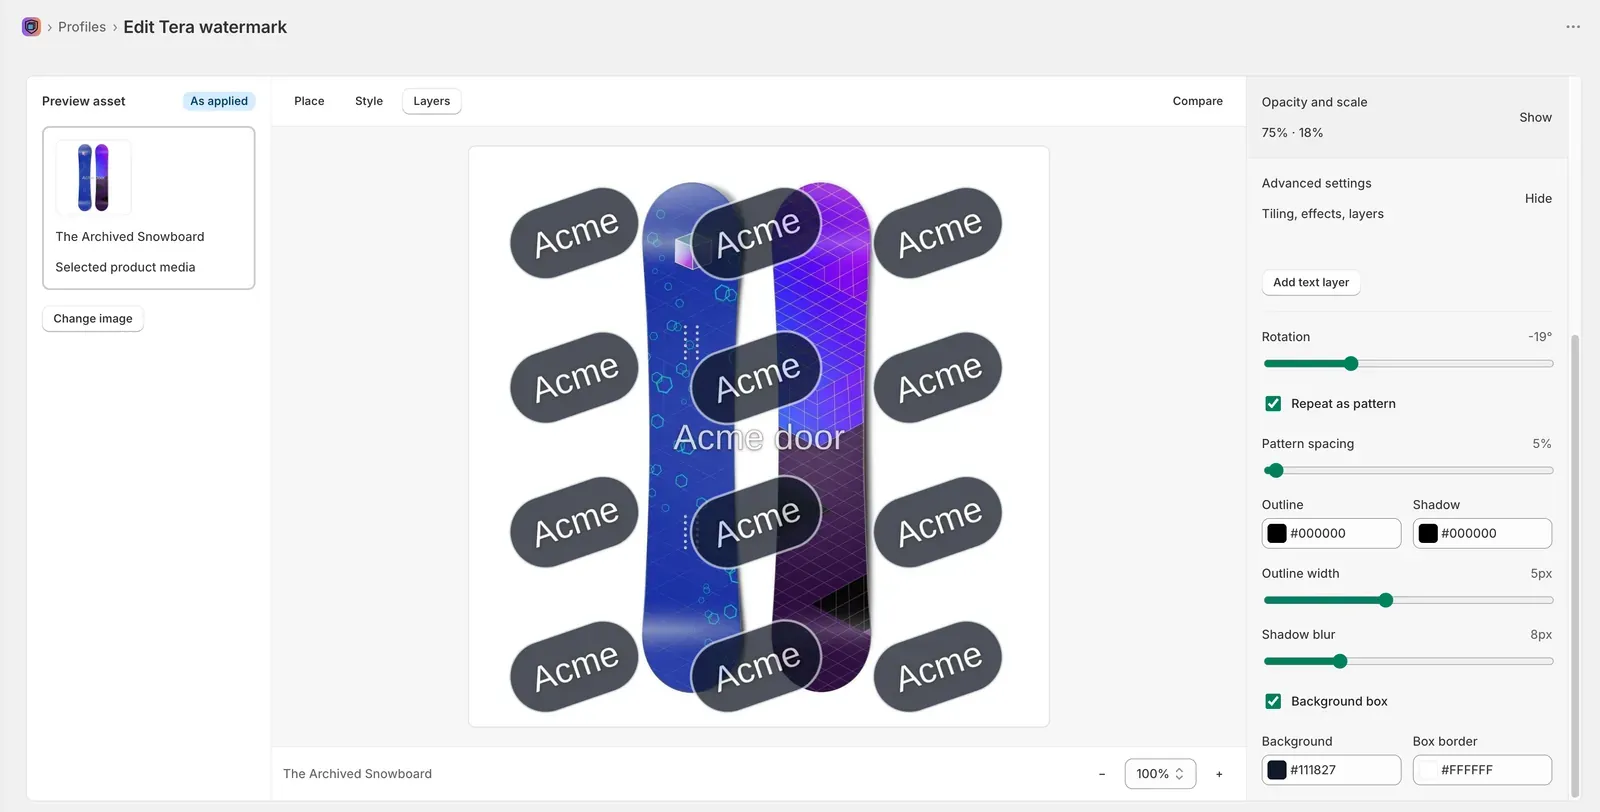
Why centered, tiled and varied marks are harder to strip: Can AI remove watermarks?
What opacity should a watermark be?
Visible vs. ignorable
Opacity runs from 0% to 100% in RD Watermark. Too low, and the mark disappears on busy photos. Too high, and it competes with the product. As a suggested starting point, try 30–50% for a corner mark, 25–40% for a centered mark, and 15–30% for a tiled pattern.
You'll see a “standard” or “ideal” watermark opacity quoted online, but there's no agreed number. The right opacity depends on the photo's background, the mark's color, and how much of the image the mark covers, which is why the starting ranges above differ by placement.
Contrast beats opacity
If a transparent watermark vanishes on dark or busy photos, add contrast before you raise opacity. RD Watermark offers an Outline (width 0–12), a Shadow (blur 0–32) and a Background box, plus text color and 19 fonts. An outline or shadow keeps a light mark readable on both light and dark photography without making it heavier everywhere.
Rotation
Rotation runs from −45° to +45°. A slight angle makes a mark read as deliberate, and in our view an angled mark is a little more awkward to remove with a simple straight crop. Keep it subtle; RD Watermark's starter profile uses −5°.
Logo or text watermark?
A logo builds brand recognition. Upload a transparent PNG or an SVG of up to 5 MB; a logo saved with a solid background shows up as a white box on the photo.
A text watermark is the fastest way to start: type your brand name or store domain, then pick a font, size and color. A domain also tells shoppers where the photo came from.
You can combine both. Add up to five extra text layers to a profile, such as a small “©2026 Brand” line under a logo, each with its own position, size and opacity.
Step-by-step setup: create your first watermark profile.
Match the watermark to the image type
| Image type | Suggested treatment | Why |
|---|---|---|
| Main (featured) image | No watermark | Google Merchant Center disapproves main images with watermarks, so keep it clean for Google Shopping. |
| Lifestyle shots | Centered or tiled mark | They're easy to reuse in ads and listings, so the mark should cross the scene. |
| Detail close-ups | Small corner mark | Shoppers need to see texture and finish. |
| Original designs or artwork | Tiled pattern | The design itself is the value, so protection outweighs looks. |
| Supplier images that already carry a mark | Skip | A second mark on top looks messy and adds little. |
RD Watermark has no per-product overrides, so create one named profile per style instead, such as “Main catalog, lower right” or “Wholesale preview, tiled.” Free and Starter include 1 profile, Pro 10 and Unlimited has no profile limit.
Why the main image stays clean: Google Shopping watermark rules for Shopify.
Google's own wording is in the Merchant Center image link requirements.
How reusable profiles work: Watermark profiles.
Test before you apply to the whole catalog
- Create a profile: choose text or logo, a position on the grid, size, opacity and rotation.
- Preview it on your hardest image, such as a busy background, a close crop or a dark photo, using the editor's image picker.
- Apply it to one product. In the Apply watermark dialog every image starts selected, so untick the featured image if you use Google Shopping.
- Check the storefront at desktop and mobile widths.
- Restore and adjust if needed. Restores don't count against your image quota.
- Scale up with bulk apply (Pro and Unlimited) or automation rules on any plan.
Pick your test images on purpose: a white-background studio shot, a dark or busy lifestyle photo, a close crop, and both a portrait and a landscape image. If one profile can't serve all of them, that's a sign you need a second profile rather than a compromise that suits none.
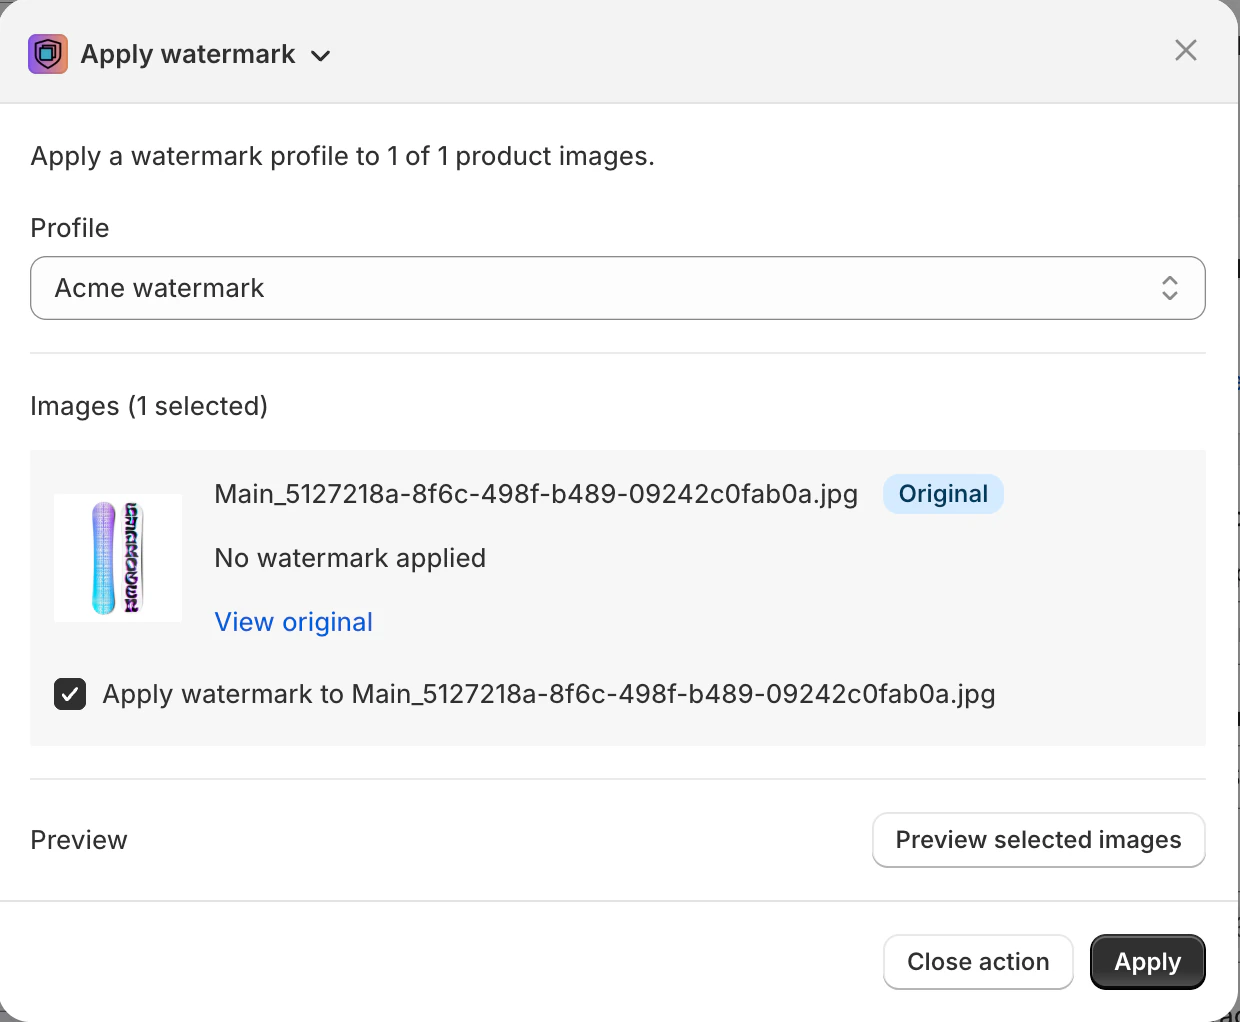
Preview tools are covered in the Editor studio guide.
Applying to a single product: apply your first watermark.
Undo and restore depth by plan: Restore originals.
Rolling out to many products: how to bulk watermark Shopify product images.
Common watermark mistakes
- One giant, fully opaque logo that hides the product.
- The same corner on every crop. A corner mark sits differently on portrait and landscape photos, so check both.
- Logos with a white box because the file isn't transparent.
- Watermarking the image your Google Shopping feed uses as the main image.
- Stacking a second mark on an already watermarked image. RD Watermark's bulk flow skips images that are already watermarked.
- Never checking how the watermark looks on a phone.
It's also worth knowing the other side of the argument. Some marketplaces discourage watermarks altogether. Etsy's help center, for example, generally doesn't recommend them and suggests building your brand into the photo instead.
Source: Etsy Help, How to Protect Listing Images.
Need the anti-removal settings? See the release note on SVG logos and anti-removal variation.
Frequently asked questions
How big should a watermark be on a product photo?
A practical starting point is 10–15% of the image's shorter side for a corner mark, or 15–25% for a centered mark. There's no universal standard, so test on your hardest photo and on a phone screen, then adjust until the mark is readable without hiding product detail.
What opacity should a watermark be?
Start around 30–50% for a corner mark and lower, around 15–30%, for tiled patterns that cover more of the image. If the mark disappears on dark or busy photos, add an outline or shadow before raising opacity.
Where is the best place to put a watermark?
Corners suit subtle brand attribution but are the easiest to crop out. A centered or tiled mark is harder to remove but more visible. Keep marks off the detail that sells the product, and leave your main Google Shopping image clean.
Should I use a tiled watermark?
Use tiling for images that get copied most, such as original designs, artwork or wholesale previews. Keep opacity low and spacing wide enough for the product to stay readable. For everyday catalog images, a single corner or center mark is usually enough.
Logo or text watermark: which is better?
A logo builds brand recognition but needs a transparent PNG or SVG. Text is quicker to set up and can include your store domain. You can also combine them: a logo plus a small text line.
Will a watermark get my products disapproved on Google Shopping?
It can if it's on the main image: Google Merchant Center disapproves main images with watermarks or logos added in post-production. Keep the featured image clean and watermark other images instead. RD Watermark doesn't connect to Google Shopping; Shopify's Google & YouTube channel sends whatever image is on your product.
Can I change my watermark later?
Yes, with RD Watermark. Every apply stores the original first, so you can restore an image (or many, in bulk on Pro and Unlimited), edit the profile and reapply. Restores don't use image quota, but each reapply counts as a new image apply.
Try these settings on your own photos
Try these settings on your own photos. Install RD Watermark free (100 images), preview on a real product, and restore any image you don't like.
Install freeNeed bulk apply and anti-removal variation? Pro and Unlimited include a 14-day free trial. Compare plans.
New to the app? Read about the Shopify watermark app.
Image limits, profile slots and trials by plan: Billing & Pricing.